Debugging Aids
Note
This section is most relevant to developers modifying VPR
The report_timing.setup.rpt file lists details about the critical path of a circuit, and is very useful for determining why your circuit is so fast or so slow.
To access detailed echo files from VPR’s operation, use the command-line option --echo_file on.
After parsing the netlist and architecture files, VPR dumps out an image of its internal data structures into echo files (typically ending in .echo).
These files can be examined to be sure that VPR is parsing the input files as you expect.
You can visualize and control the placement move generator whenever the placement engine is paused in the UI. Run with graphics and VTR_ENABLE_DEBUG_LOGGING enabled and set a breakpoint to stop placement. The new location of the moving block for each proposed move will be highlighted with GREEN and the old location will be highlighted with GOLD. The fanin and fanout blocks will also be highlighted. The move type, move outcome and delta cost will be printed in the status bar.
Warning
VPR must have been compiled with VTR_ENABLE_DEBUG_LOGGING on to get any debug output from this flag.
If the preprocessor flag DEBUG is defined in vpr_types.h, some additional sanity checks are performed during a run.
DEBUG only slows execution by 1 to 2%.
The major sanity checks are always enabled, regardless of the state of DEBUG.
Finally, if VERBOSE is set in vpr_types.h, a great deal of intermediate data will be printed to the screen as VPR runs.
If you set verbose, you may want to redirect screen output to a file.
The initial and final placement costs provide useful numbers for regression testing the netlist parsers and the placer, respectively. VPR generates and prints out a routing serial number to allow easy regression testing of the router.
Finally, if you need to route an FPGA whose routing architecture cannot be described in VPR’s architecture description file, don’t despair!
The router, graphics, sanity checker, and statistics routines all work only with a graph that defines all the available routing resources in the FPGA and the permissible connections between them.
If you change the routines that build this graph (in rr_graph*.c) so that they create a graph describing your FPGA, you should be able to route your FPGA.
If you want to read a text file describing the entire routing resource graph, call the dump_rr_graph subroutine.
Placer and Router Debugger

Overview
It can be very useful to stop the program at a significant point and evaluate the circuit at that stage. This debugger allows setting breakpoints during placement and routing using a variety of variables and operations. For example the user can stop the placer after a certain number of perturbations, temperature changes, or when a specific block is moved. It can also stop after a net is routed in the routing process and other such scenarios. There are multiple ways to set and manipulate breakpoints which are all explained in detail below.
Adding a breakpoint
Currently the user is required to have graphics on in order to set breakpoints. By clocking the “Debug” button, the debugger window opens up and from there the user can enter integer values in the entry fields and set breakpoints. A more advanced option is using expressions which allows a wider variety of settings since the user can incorporate multiple variables and use boolean operators. This option is found by clicking the “Advanced” button in the debugger window. Using an expression is more accurate than the entry fields when setting multiple breakpoints.
Enabling/Disabling a breakpoint
Enabling and disabling breakpoints are done using the checkboxes in front of each breakpoint in the breakpoint list. The breakpoint is enabled when the box is checked and disabled otherwise.
Deleting a breakpoint
Deleting a breakpoint is done using the trash can button in front of each breakpoint in the breakpoint list.
Reaching a breakpoint
Upon reaching a breakpoint, the program will stop, notify the user which breakpoint was encountered, and give a summary of the current variable values. This information is presented through a pop-up window and printed to the terminal as well.
Available Variables
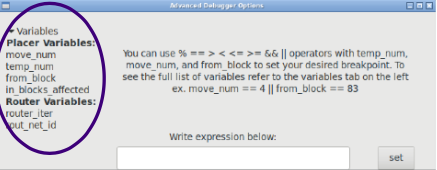
You can also find the variables’ list in the Advanced Settings Window, on the left.
Placer Variables
- move_num: every placer perturbation counts as a move, so the user can stop the program after a certain number of moves. This breakpoint can be enabled through the entry field on the main debugger window or using an expression. It should be noted however, that using the entry field would proceed the specified number of moves. (as in the second example)
Ex. move _num == 33
Ex. move_num += 4
- temp_count: every time the temperature is updated it counts as an increase to temp_count. This breakpoint can be enabled through the entry field on the main debugger window or using an expression. It should be noted however, that using the entry field would proceed the specified number of temperatures. (as in the second example)
Ex. temp_count == 5
Ex. temp_count += 5
- from_block: in every placer move one or more blocks are relocated. from_block specifies the first block that is relocated in every move; and a breakpoint of this type stops the program when the first block moved is the one indicated by the user. This breakpoint can be enabled through the entry field on the main debugger window or using an expression.
Ex. from_block == 83
- in_blocks_affected: this variable allows you to stop after your specified block was moved. Unlike “from_block” which only checks the first block relocated in every move, in_blocks_affected looks through all the blocks whose locations were changed by that move. This breakpoint can only be enabled through the use of an expression.
Ex. in_blocks_affected == 83
Router Variables
- router_iter: Every pass through the whole netlist (with each unrouted or poorly routed net being re-routed) counts as a router iteration. This breakpoint can be enabled through the entry field on the main debugger window or using an expression.
Ex. router_iter == 2
- route_net_id: stops after the specified net is rerouted. This breakpoint can be enabled through the entry field on the main debugger window or using an expression.
route_net_id == 12
Available Operators
- ==
Ex. temp_count == 2
- >
Ex. move_num > 94
- <
Ex. move_num < 94
- >=
Ex. router_iter >=2
- <=
Ex. router_iter <=2
- &&
Ex. from_block == 83 && move_num > 72
- ||
Ex. in_blocks_affected == 11 || temp_count == 9
- +=
Ex. move_num += 8